Connecting to MySQL via SSH Tunnelling
MySQL is a common target of a wide range of attacks. By default, the service configured to only listen on localhost, meaning that it can only be accessed by processes running on the same server. Many developers want to connect to their MySQL instances remotely, and to achieve this they change MySQL to listen publicly. This introduces an avoidable security risk.
In this guide, we’ll discuss how you can create an SSH tunnel to connect to MySQL remotely, without the need to set MySQL to listen publicly.
What is SSH Tunnelling
SSH Tunnelling leverages an SSH connection to communicate with services on a remote server. It does this by listening on a network port on the client, and forwarding any traffic received on that port to a port on the remote server. The connection is secure as SSH connections are always encrypted, and when the tunnelled traffic arrives to the remote server, it will appear to the service as if the connection originated from localhost. This is extremely useful when connecting to services such as MySQL, and allows you to maintain the best practices of keep the MySQL port closed and MySQL bound to localhost only.
SSH Tunnelling with MySQL Workbench
Creating a new connection
Start by opening MySQL Workbench
Next to MySQL Connection, click the
+button.
Below are the parameters you will need to fill in:
Parameters |
Description |
|---|---|
Connection Name |
A name for the connection that uniquely identifies the connection you’re making. |
SSH Hostname |
The IP address of the server you’re connecting to, followed by the port. With UKFast installations, the default SSH port is |
SSH Username |
The username you use to SSH onto the server. |
SSH Password / SSH Key File |
This is the SSH password or the SSH key for your server. |
MySQL Hostname |
As we’re connecting via an SSH Tunnel, this will likely be |
MySQL Server Port |
The default for this is |
Username |
The MySQL user that you’re connecting as. As we’re connecting locally, it will need to be a user which has the host set to |
Password |
The MySQL password for the MySQL user. |
Note
When entering passwords, MySQL Workbench offers users the ability to store passwords in an encrypted Vault on the machine where it is running. See MySQL - The Password Storage Vault for more information.
Testing the connection
Once you’ve entered all the above parameters, click Test Connection.
You may receive a prompt about the fingerprint not being recognised. If this is the first time connecting to the server, and you’re confident that the details you’ve entered are correct, click Yes.
This should return Successfully made the MySQL connection. Click OK, and then OK again to save the configuration.
If this is unsuccessful due to incorrect MySQL credentials, check the MySQL privileged to ensure that the
userit correct and that thehostis set tolocalhost.
SSH Tunnelling with Other Clients (Windows)
While most MySQL clients support SSH tunnelling, some clients do not. Using PuTTY, we can create an SSH tunnel system-wide, so that you can connect to MySQL on localhost:3306, and this will will route the traffic to the server. To do this, follow the below steps:
If you don’t already have PuTTY, you can download it at: https://www.chiark.greenend.org.uk/~sgtatham/putty/latest.html. Download the 32/64-bit installer (most modern operating systems are 64-bit, so if you’re unsure, try this first). Open the downloaded
.exeand go through the installation steps.Once installed, open PuTTY. Below are the values to enter, along with their description.
Configuring PuTTY with SSH Tunnelling
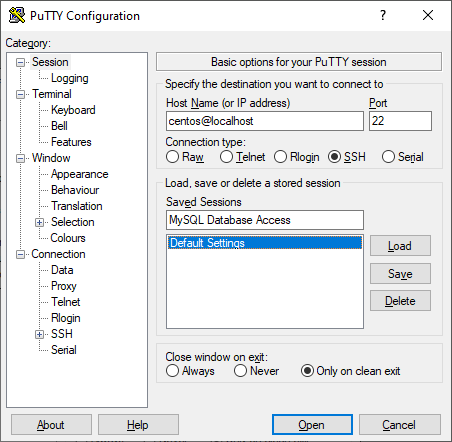
Session
In PuTTY, on the left side, you can see the different categories for values. Start off by selecting Session, and fill in the values below:
Value |
Description |
|---|---|
SSH Hostname |
Your SSH username, followed by the IP address of the server you’re connecting to. For example, |
SSH Port |
The default SSH port for UKFast servers is |
Saved Sessions |
Enter a name to uniquely identify this connection. |
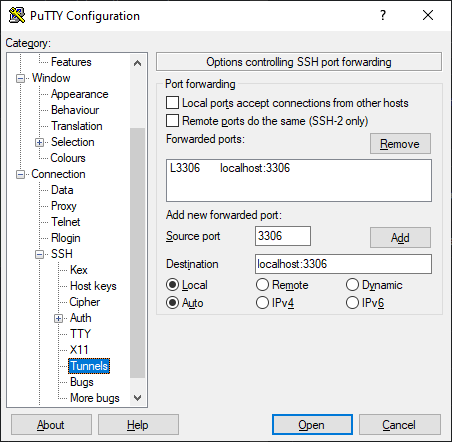
Tunnels
On the left menu, scroll down and select Tunnels (under Connection > SSH > Tunnels). This is where we will configure the SSH tunnel.
Value |
Description |
|---|---|
Source Port |
|
Destination |
|
Radio Button: Local |
|
Radio Button: Auto |
Keep this on |
Click Add.
Optional: Key-Based Authentication
If you’re using SSH keys to authenticate, go to Connections > SSH >
Saving and testing your configuration
Once you have completed the above steps, go back to Session and click Save. This saves your configuration under Saved Sessions using the name you specify.
Now, whenever you open PuTTY, you will be able to load your configuration by selecting the Saved Sessions name and clicking Load.
Click Open to open your SSH session and tunnel.
You’ll now be able to connect to MySQL with your client by specifying the host as localhost and the port as 3306. The traffic will then be tunnelled through SSH to the server.
Conclusion
We’ve covered a couple of different ways of connecting to MySQL using SSH tunnels. While we cannot cover every MySQL client, this provides you with all the values and information you’ll need to get connected to a MySQL instance through an encrypted SSH tunnel, allowing you to lock down your MySQL port and create users with the host set as localhost.